Prepare Usody USB-pendrive
The purpose of this guide is to show the necessary steps to prepare a Usody pendrive in order to retrieve device meta-data and upload it to the Usody inventory, or in addition erase the data.
This guide is only valid for users of Usody Hardware Metadata 2022 and Usody Data Erasure v14, the Usody pendrive setup for previous versions can be found at this link Usody Pendrive 11.
Introduction
The Usody pendrive is a bootable USB pendive that includes a Linux Operating System and an Usody application to create Snapshots of your device's hardware, as well as other tests to evaluate the quality of the device.
Requirements
- a USB pendrive with at least 500 MB of total capacity,
- an ISO image containing the Usody software (in this setup we explain where to download it),
- a specific application to burn this ISO image (in this setup we suggest one).
Step 1 - Download ISO image
-
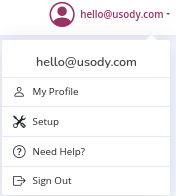
Click on your profile icon, in the drop-down menu click on the "Setup" option.
-
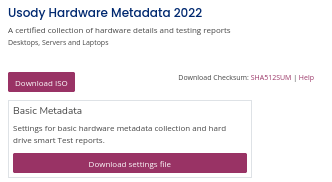
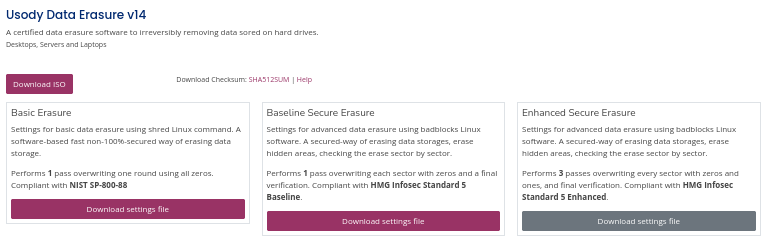
Click on the Download ISO button depending on whether you want to inventory and test or erase the data:
-
To download the inventory and test only ISO image click on "Download ISO" in the Usody Hardware Metadata 2022 section.
-
To download the erase ISO image click on "Download ISO" in the Usody Data Erasure v14.4 section.
-
Step 2 - Burn ISO image
Remember that burning the ISO will format the flash drive during the process, which will erase all data stored on it.
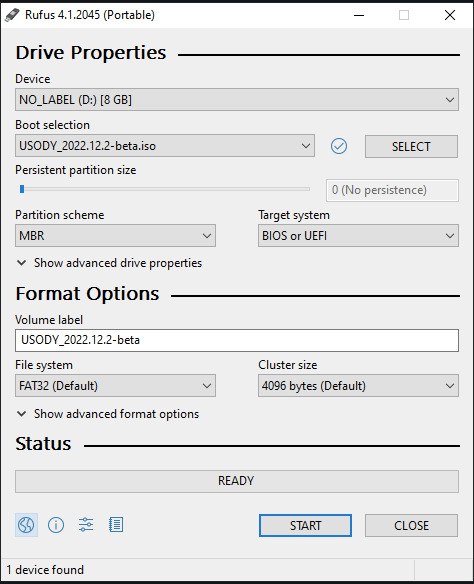
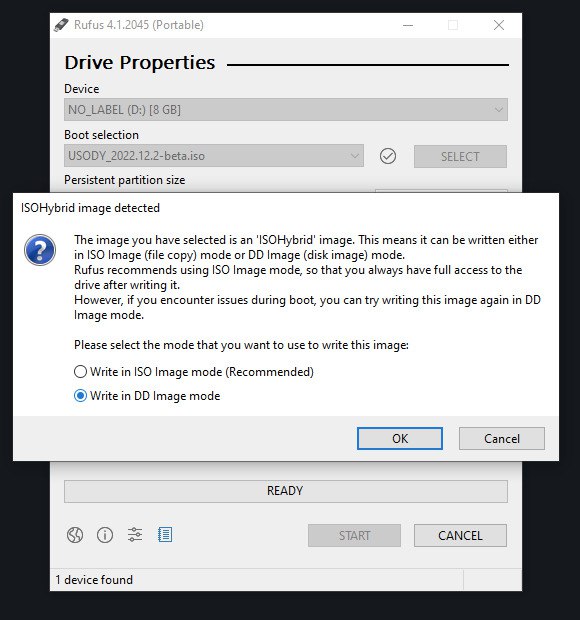
On windows you can use Rufus.
-
Select Device and ISO files. Then click on "START" button.
-
IMPORTANT! You have to select the DD option, as shown in the following image
On Linux we recommend directly using the dd command in terminal.
Warning: Be extremely careful when using the dd command, as it can overwrite data on your storage media without any warning. Make sure to select the correct target device, as all data on that device will be lost. Double-check the device name before running the command.
-
Connect the USB drive or storage media to your computer. Make sure to identify the correct device name of the USB drive. This can be done using the lsblk command:
lsblkThe output will list all available storage devices, including the USB drive. Identify the device name, such as /dev/sdX, where "X" represents a letter corresponding to your USB drive (e.g., /dev/sdb, /dev/sdc, etc.).
-
Use the dd command to burn the ISO file to the USB drive. Replace /path/to/your.iso with the actual path to the ISO file, and /dev/sdX with the correct device name of your USB drive:
sudo dd if=/path/to/your.iso of=/dev/sdX bs=4M -
After the dd command finishes, it will display a summary of the number of records in and out, as well as any errors encountered. If there are no errors and the command finishes successfully, the ISO file has been burned to the USB drive.
On MacOS we recommend directly using the dd command in terminal.
Warning: Be extremely careful when using the dd command, as it can overwrite data on your storage media without any warning. Make sure to select the correct target device, as all data on that device will be lost. Double-check the device name before running the command.
-
Connect the USB drive or storage media to your computer. Make sure to identify the correct device name of the USB drive. This can be done using the lsblk command:
diskutil listThe output will list all available storage devices, including the USB drive. Identify the device name, such as /dev/diskX, where "X" represents a letter corresponding to your USB drive (e.g., /dev/disk2, /dev/disk3, etc.).
-
Use the dd command to burn the ISO file to the USB drive. Replace /path/to/your.iso with the actual path to the ISO file, and /dev/diskX with the correct device name of your USB drive:
sudo dd if=/path/to/your.iso of=/dev/diskX bs=4M -
After the dd command finishes, it will display a summary of the number of records in and out, as well as any errors encountered. If there are no errors and the command finishes successfully, the ISO file has been successfully burned to the USB drive.
Alternatively, if you do not want to use the terminal on Linux or MacOS, you can also use tools with a graphical interface that leverage the dd command. For example UNetbootin.
Step 3 - Add the settings file into the pendrive
The settings.ini file contains your user credentials in the form of a token that allows you to upload your Snapshots to your inventory and the configuration of what the Usody software should do. There is a different settings.ini file for each type of configuration.
If you do not perform this step, the snapshot files will be stored on the pendrive drive, you must copy them and upload them via the web.
-
Download the settings.ini file depending on whether you want to inventory and test or just delete the data:
-
To download the settings file for inventory and test only, click on the "Download settings file" button in the Usody Hardware Metadata 2022 section.
-
To download the inventory and erasure settings file, click on the "Download settings file" button in the Usody Data Erasure v14 section.
Note: Each type of erasure has different settings, download the one you need accordingly.
-
-
Overwrite the settings.ini file inside the 'settings' folder
- If you use Windows, the partition is mounted automatically just by connecting the pendrive to the PC, and the File Explorer will open.
-
In case of Linux, the partition has to be mounted manually:
-
Enter the following command-line command to identify the "Hidden FAT16 < 32M" partition
sudo fdisk -lThe result of executing the command is as follows:
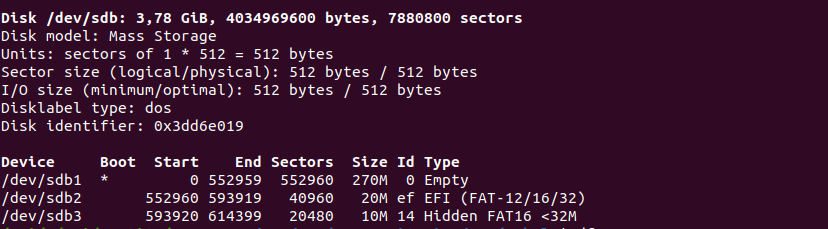
Note: In our case it is /dev/sdb3.
-
Mount the partition
sudo mount /dev/sda3 /mnt -
Copy the settings.ini file to the partition folder
sudo cp /home/$USER/Downloads/settings.ini /mnt/settings/settings.ini -
Unmount the USB
sudo umount /mnt
-
-
In case of MacOS, the partition has to be mounted manually:
-
Enter the following command-line command to identify the "Hidden FAT16 < 32M" partition
sudo diskutil info -
Create the mount point inside Volumes
sudo mkdir /Volumes/UsodyUSB -
Mount the persistence partition
sudo mount -t msdos /dev/disk4s3 /Volumes/UsodyUSB -
Copy the settings.ini file to the partition folder. Replace /path/to/your/ with the actual path to the settings.ini file that you have previously downloaded.
sudo cp /path/to/your/settings.ini /Volumes/UsodyUSB/settings/ -
Unmount the mount point
sudo umount /Volumes/UsodyUSB -
Eject the USB
sudo diskutil eject /dev/disk4
-
To verify that the Usody pendrive is working properly, follow these steps: tutorial
Congratulations, you now have your Usody pendrive ready to retrieve device meta-data and upload it to your inventory!